Stunning And Easy Drawing Of A Rose: A Beginner's Guide
Ever wanted to create a stunning and easy drawing of a rose but didn’t know where to start? Well, you’re in the right place, buddy! Drawing roses might sound intimidating, but trust me, it’s simpler than you think. With just a few steps, the right tools, and some patience, you’ll be sketching beautiful roses in no time. Let’s dive into this beginner-friendly guide and make art magic happen!
Art doesn’t have to be perfect right off the bat. Even the most accomplished artists started with shaky lines and simple shapes. This guide is tailored specifically for beginners who want to learn how to create a stunning and easy drawing of a rose without feeling overwhelmed. We’ll break it down step by step so you can master the basics and build confidence in your skills.
So grab your pencils, erasers, and a fresh sheet of paper because we’re about to level up your drawing game. Whether you’re doing this for fun, school projects, or even as a potential career path, learning how to draw a rose is an excellent way to express creativity. Let’s get started!
- Hair Designs For Females Unleash Your Inner Style Icon
- Movierulz Pz Songs Your Ultimate Destination For Latest Movie Tracks
Why Drawing a Rose is Perfect for Beginners
Let’s face it—roses are iconic. They symbolize love, beauty, and elegance, making them a popular subject in art. But why is drawing a rose such a great starting point for beginners? First off, roses have a structured shape that’s easy to break down into basic forms. Plus, they’re forgiving! If you mess up a petal or two, it’s all part of the process. Here’s why roses are ideal for newbies:
- Roses have a predictable shape, making them easier to replicate.
- You can experiment with shading techniques to add depth and texture.
- They’re versatile, allowing you to practice different styles and perspectives.
Think of drawing a rose as your gateway to exploring more complex subjects. Once you nail the basics, you’ll feel more confident tackling other objects and scenes. And hey, who doesn’t love a good rose sketch to hang on their wall?
Tools You’ll Need to Get Started
Before we dive into the actual drawing process, let’s talk about the tools you’ll need. You don’t have to go out and buy an entire art studio’s worth of supplies. In fact, you can start with just a few essentials:
- Stylish Haircut For Women Unlock Your Style And Confidence
- Older Ladies Haircuts The Ultimate Guide To Finding Your Perfect Style
Essential Drawing Supplies
- Pencils (HB, 2B, 4B for varying shades)
- Eraser (a kneaded eraser is highly recommended)
- Good quality drawing paper
- Blending tools (optional, like a blending stump or tortillon)
These tools will help you achieve the smooth lines and shading needed to create a stunning and easy drawing of a rose. Don’t worry if you don’t have everything listed above; you can always upgrade your supplies as you progress.
Understanding the Anatomy of a Rose
To draw a rose that looks realistic, it’s important to understand its structure. A rose isn’t just a blob of petals—it has distinct parts that work together to create its beauty. Here’s a quick breakdown:
- Center: The heart of the rose where the petals originate.
- Petals: These are the main attraction! They overlap and curl in various ways.
- Leaves: Don’t forget the leaves! They add balance and depth to your drawing.
- Stem: The stem connects everything and provides support.
By studying the anatomy of a rose, you’ll gain a better understanding of how to draw each part accurately. This knowledge will make your drawings look more authentic and captivating.
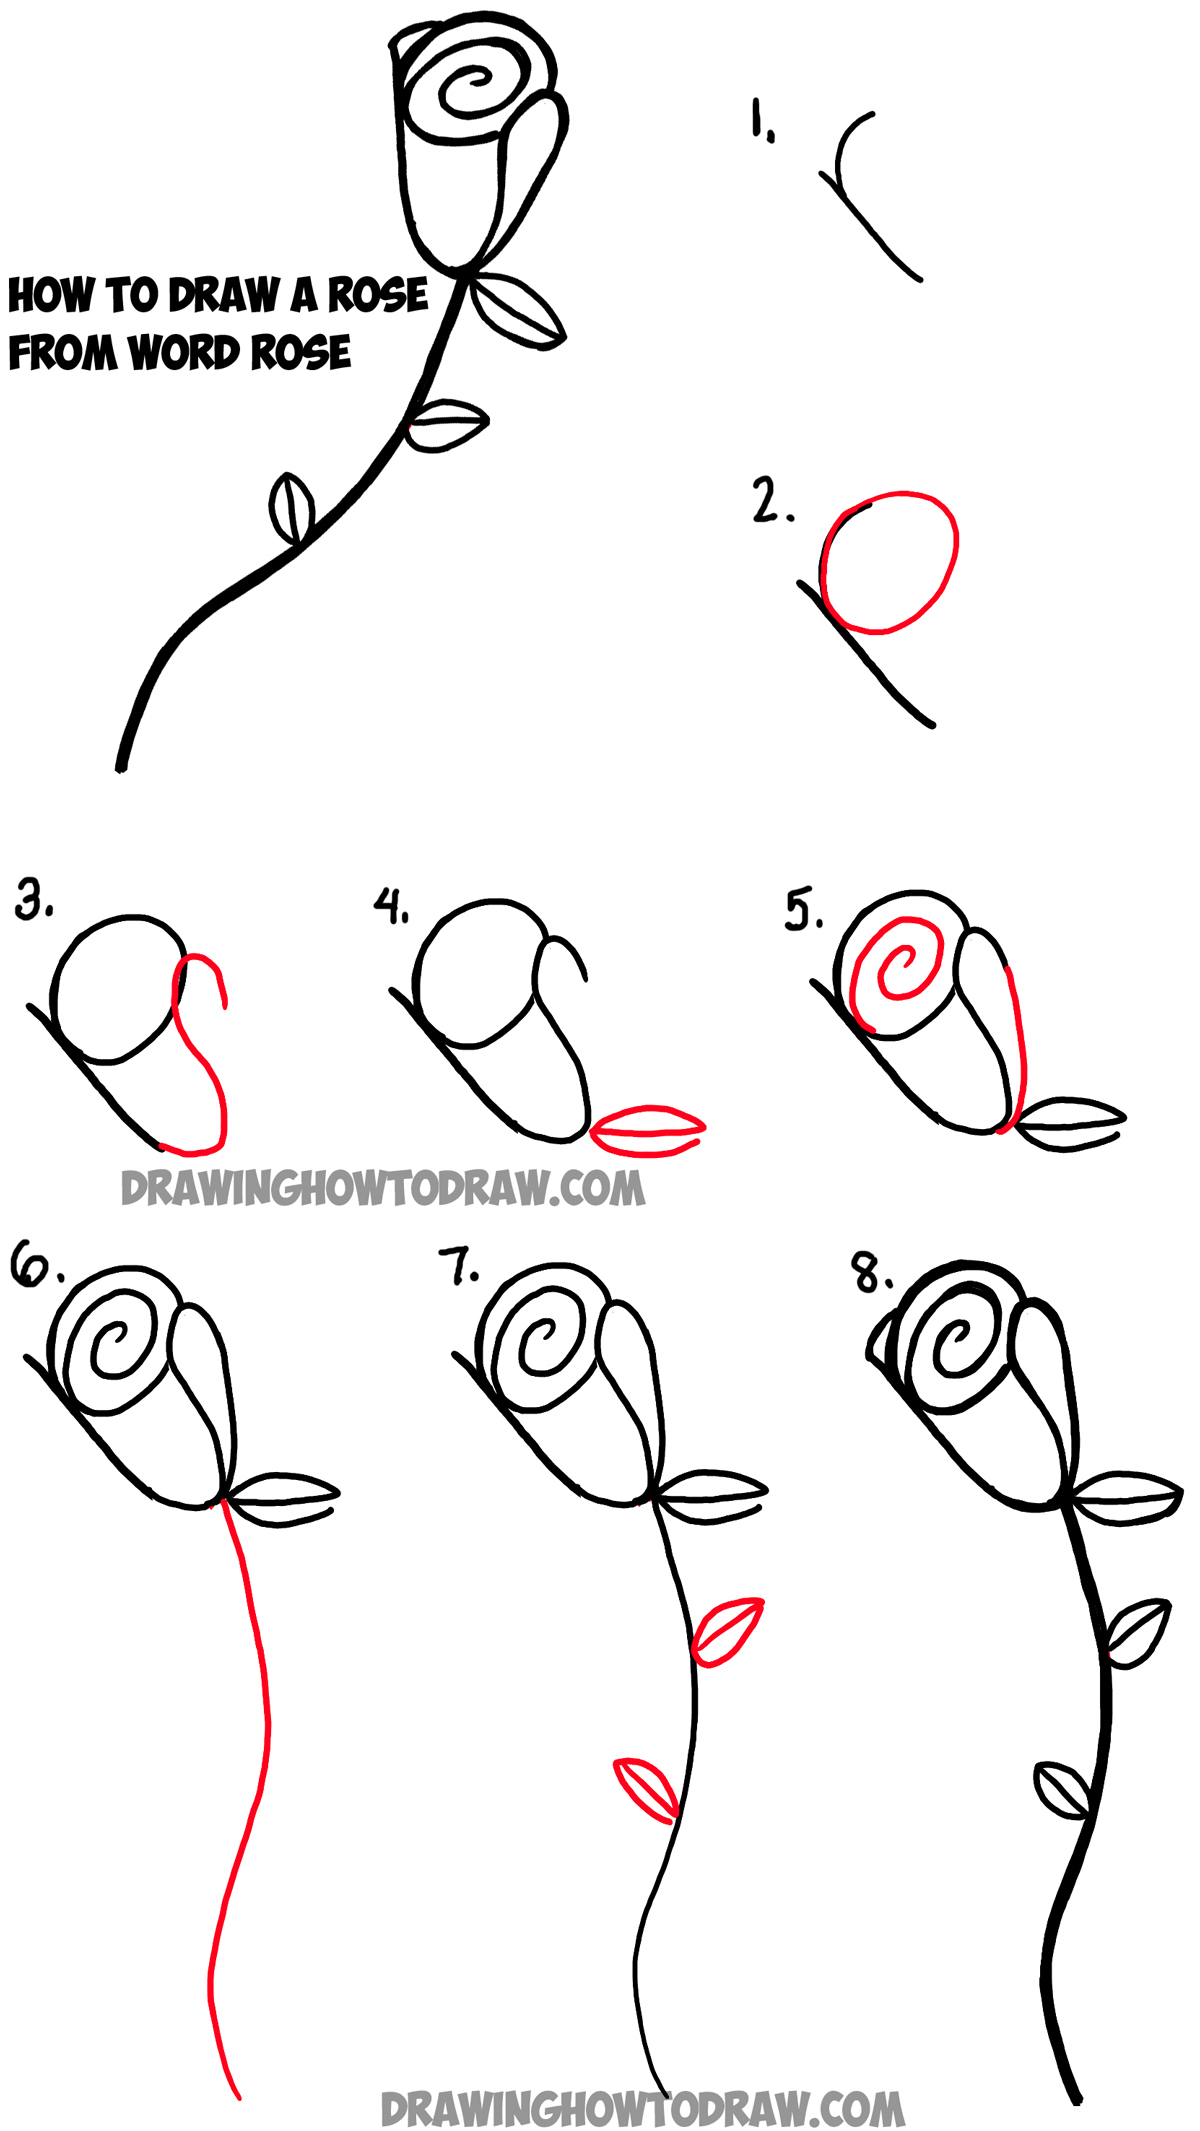
Step-by-Step Guide to Drawing a Rose
Now that you’ve got your tools and an understanding of the rose’s structure, let’s dive into the step-by-step process. This method is designed to be simple and approachable for beginners, so don’t stress if your first attempt isn’t perfect. Practice makes perfect!
Step 1: Sketch the Center
Start by drawing a small oval or circle for the center of the rose. This will serve as the foundation for the rest of your drawing. Keep your lines light so you can easily erase and adjust as needed.
Step 2: Add the First Layer of Petals
Draw a few curved lines around the center to form the first layer of petals. Think of them as soft, flowing shapes that wrap around the center. Remember, petals aren’t perfect—they’re meant to look natural and organic.
Step 3: Build the Outer Layers
Continue adding layers of petals, gradually increasing their size as you move outward. Pay attention to how the petals overlap and curl. This will give your rose a three-dimensional look.
Step 4: Add the Stem and Leaves
Once you’re happy with the petals, sketch in the stem and leaves. The stem should be smooth and slightly curved, while the leaves can have jagged edges to mimic their natural texture.
Step 5: Refine Your Sketch
Now it’s time to refine your drawing. Erase any unnecessary lines and clean up the overall shape. Make sure everything looks balanced and harmonious.
Step 6: Shade and Add Texture
Use your pencils to add shading and texture to your rose. Focus on creating gradients that transition smoothly from light to dark. This will give your drawing depth and make it pop off the page.
Tips for a Stunning and Easy Drawing of a Rose
Here are a few tips to take your rose drawing to the next level:
- Study real roses or photos to get a better understanding of their structure.
- Practice drawing different types of roses to see which style you prefer.
- Experiment with color if you’re using colored pencils or markers.
- Don’t be afraid to make mistakes—they’re part of the learning process!
Remember, the goal is to have fun and express yourself creatively. There’s no right or wrong way to draw a rose, so let your imagination run wild!
Common Mistakes to Avoid
Even the best artists make mistakes, but being aware of common pitfalls can help you improve faster. Here are a few things to watch out for:
- Pressing too hard with your pencil, making it difficult to erase mistakes.
- Ignoring the overlapping of petals, which can make your rose look flat.
- Forgetting to add shading, which is crucial for creating depth.
By avoiding these mistakes, you’ll be able to create a more polished and professional-looking drawing.
Advanced Techniques for Drawing Roses
Once you’ve mastered the basics, you can start exploring more advanced techniques. Here are a few ideas to challenge yourself:
1. Experiment with Perspective
Try drawing roses from different angles, such as a side view or a close-up of the center. This will help you develop a deeper understanding of their structure.
2. Add Color
If you’re comfortable with pencils, consider trying colored pencils or watercolors. Adding color can bring your rose to life and make it even more stunning.
3. Play with Lighting
Experiment with different lighting scenarios to see how they affect the shading and texture of your rose. This will help you create more dynamic and realistic drawings.
Resources for Learning More
If you’re eager to learn more about drawing roses, there are plenty of resources available. Here are a few recommendations:
- ArtStation: A platform where artists share their work and tutorials.
- DeviantArt: A community for artists to showcase their creations and offer feedback.
- YouTube: A treasure trove of free tutorials and tips from experienced artists.
These resources will provide you with endless inspiration and guidance as you continue your artistic journey.
Conclusion: Keep Practicing and Have Fun
And there you have it—a stunning and easy drawing of a rose that even beginners can tackle. Remember, art is all about practice and patience. The more you draw, the better you’ll become. So don’t be afraid to experiment, make mistakes, and most importantly, have fun!
Now it’s your turn. Grab your supplies and start sketching that rose. When you’re done, share your masterpiece with the world. Who knows? You might inspire others to pick up a pencil and join you on this creative journey. Until next time, keep creating and keep shining!
Table of Contents
- Why Drawing a Rose is Perfect for Beginners
- Tools You’ll Need to Get Started
- Understanding the Anatomy of a Rose
- Step-by-Step Guide to Drawing a Rose
- Tips for a Stunning and Easy Drawing of a Rose
- Common Mistakes to Avoid
- Advanced Techniques for Drawing Roses
- Resources for Learning More
- Conclusion: Keep Practicing and Have Fun
- 2024 Womens Hair The Ultimate Guide To Trendsetting Styles
- Hairstyles With Glasses And Bangs The Ultimate Guide For A Flawless Look

How to Draw a Red Rose Step by Step Guide
Rose Drawing Steps Beginners at Explore collection

Rose Drawing Easy at Explore collection of Rose
